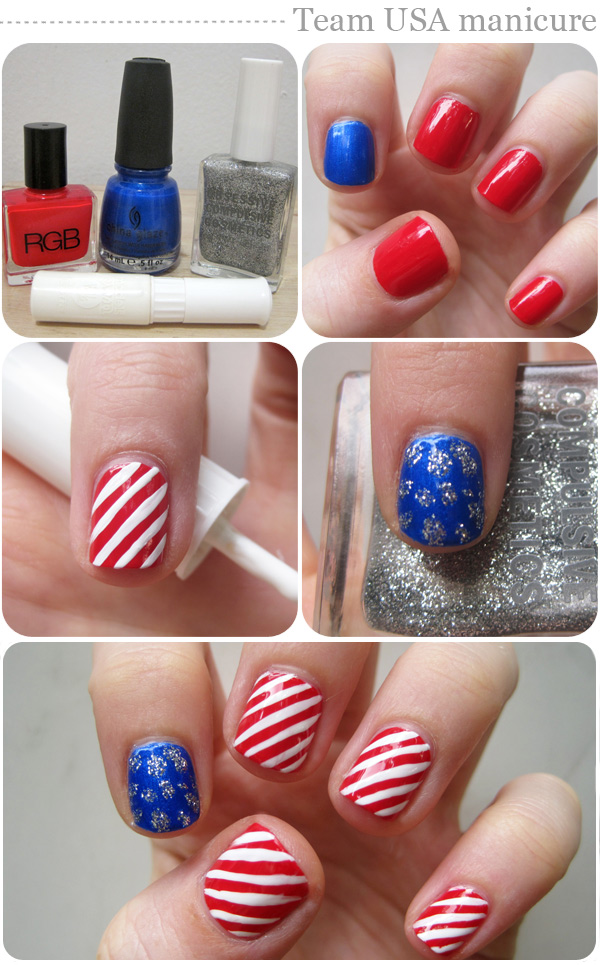
- Show your love for Team USA by sporting the iconic colors of the flag on your digits. For my red, white and blue polishes, I chose RGB Too Red, China Glaze Frostbite and a white nail art pen/brush from Models Own. If you don’t have a nail art brush, you can use an angled eyeliner brush, a Q-tip or a paper clip to apply the stripes. You’ll also need a silver glitter like Obsessive Compulsive Cosmetics in Arsenic.
- Paint your nails with red polish, except for a “status nail” on each hand, which you’ll paint blue.
- Using your nail art brush or other tool, paint thin diagonal lines of white polish across each red nail. It’s OK if they aren’t perfect -- they’ll still look great even if your lines are a little shaky.
- To create “stars,” apply small dots of glitter onto the blue “status nail.”
- Clean up around the edges with remover, and then add a glossy top coat. Now you’re ready to cheer for your home team in style.
Steps to create this nail art design:
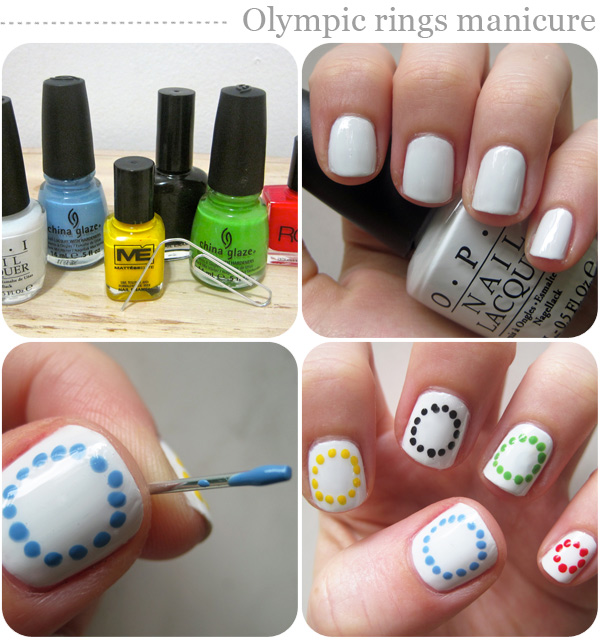
- The Olympic rings are the most iconic image of the Olympic Games, and since there are five rings, they translate perfectly into nail art. Begin by choosing five polishes in the colors of the rings, as well as a white or neutral base. I’m using China Glaze Electric Beat, Mattese Elite Almost Famous, Mattese Elite Black, China Glaze Gaga for Green and RGB Too Red, plus the off-white OPI My Boyfriend Scales Walls as my base.
- Paint each nail with a neutral shade like white, gray or nude. I love how the colors pop against a bright or slightly off-white polish.
- Unfold a paper clip and carefully dip the end into your first color. Make small dots with the tip of the polish-dipped paper clip, forming a circle on the nail. Wipe off the paper clip and continue with the remaining colors until each nail is adorned with a ring.
- Before adding a top coat, make sure to let the colored polish dry completely to avoid smearing the festive rings.
Steps to create this nail art design:
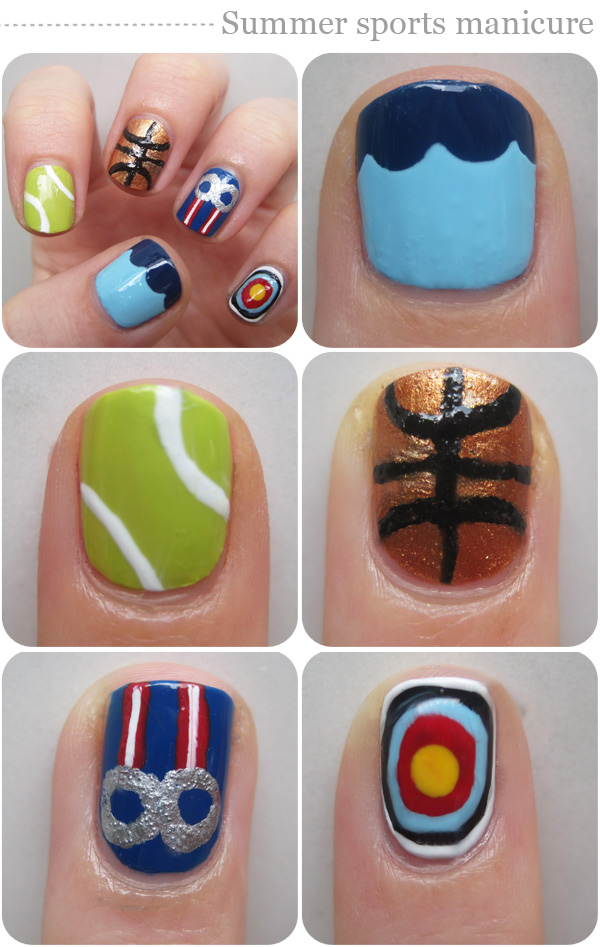
Thumb - Swimming:From diving to synchronized swimming, the pool is a Summer Olympics hotspot. Begin with a dark blue polish like China Glaze First Mate. After applying a top coat and letting the polish dry completely, cut a piece of Scotch tape with decorative scrapbooking scissors in a scalloped pattern to create a wave-like edge on one side of the tape. If you don’t have decorative scissors, you can freehand a wavy pattern onto the tape with a small pair of scissors. Press the tape firmly onto the nail and fill in the bottom portion of the nail with a brighter blue like Obsessive Compulsive Cosmetics Pool Boy. Carefully remove the Scotch tape to reveal your finished design.
Pointer finger - Tennis:To get this simple tennis ball look, paint your nail with a bright green polish like Obsessive Compulsive Cosmetics Wasabi. Using a nail art pen/brush, draw two curved lines onto the sides of the nail with white polish. It’s as simple as that!
Middle finger - Basketball:Begin with a gold, brown or bronze polish like Sephora Vivid Metallic. Once the base polish is dry, pick up some black polish on the tip of a paper clip or a small nail art brush and carefully paint a vertical line down the nail, followed by a horizontal line across the center. Finish with two slightly arched lines at the top and bottom of the nail to create the classic basketball stripes. Make sure to let the polish dry completely before adding a top coat so you don’t smear your handiwork!
Ring finger - Gymnastics:Gymnastics is one of the most-watched sports of the Olympics, and the still rings are an iconic symbol of the sport. Begin by painting your nail with a dark base like Kure Bazaar Mon Bleu. Paint two thin vertical stripes in the color of your choice from the top of the nail, stopping about half-way down. At the base of the stripes, create two small circles using a paper clip or a pointy Q-tip dipped in shiny silver polish like Sally Hansen Insta-Dri in Silver Sweep. Allow the design to dry completely and finish with a glossy top coat.
Pinky finger - Archery:
To create an archery bull's eye on your nail, begin with a coat of white polish. Once the white has dried, paint an oval of black polish, just slightly smaller than the shape of your nail. Continue with blue, red and yellow until you’ve reached the center of the nail. As the circles get smaller, you can switch to a Q-tip or a paper clip to get a more precise design.

Steps to create this nail art design:
- A small makeup sponge is the ideal tool for creating a gradient nail design with ease. In addition to the sponge, gather a gold, yellow, orange and red polish to create this fiery look. I’m using Color Club Disco Nap, Mattese Elite Almost Famous, Essie Meet Me At Sunset and RGB Too Red.
- Paint each nail with yellow polish. Once the yellow is dry, apply a drop of orange polish onto the tip of the makeup sponge. Dab excess polish onto a paper towel, and then begin sponging orange onto each nail, concentrating most of the color at the base.
- Apply red polish to a clean edge of the sponge and sponge the polish onto the very base of the nail. Don’t worry about getting polish on your skin. Once you’re happy with the look, use a small brush or Q-tip dipped in remover to clean up all excess polish.
- To create the gold torch, paint your thumb nail with metallic polish. Add a top coat for protection and shine.
Steps to create this nail art design:
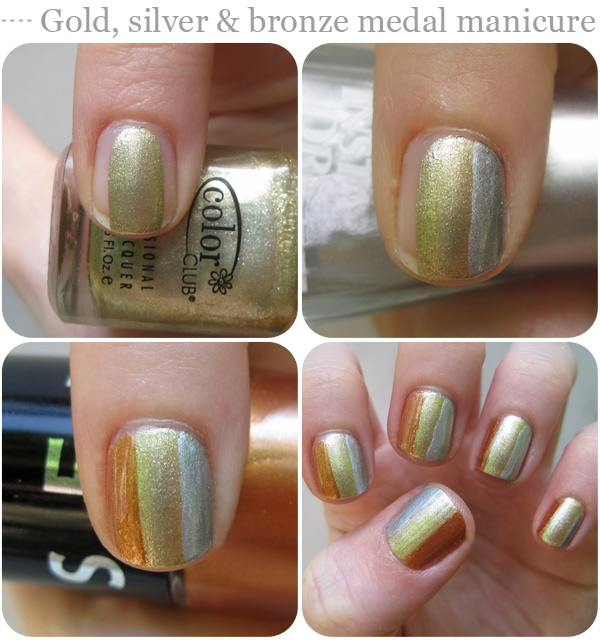
- For this chic metallic manicure, choose three polishes to represent the Olympic medals -- gold, silver and bronze. I’m using Color Club Disco Nap, Sally Hansen Insta-Dri Silver Sweep and Sephora Vivid Metallic.
- Begin by painting a stripe of gold down the center of each nail. I like to do this freehand, but you could create perfect lines by using Scotch tape as a barrier.
- Add a silver stripe on one side of the gold, followed by a stripe of bronze polish on the opposite side.
- Clean up any stray color with remover and add a glossy top coat to bring even more shine to this podium-worthy nail art.
Δεν υπάρχουν σχόλια:
Δημοσίευση σχολίου